Would you believe if I told you that Fargo is a hip town? Surely, we are.
Sadly one of my biggest critiques about living in Fargo is that brand names are a heavy influence in North Dakota so sometimes the little guys suffer the consequences while chains and big box stores seem to rule the retail. However there are some really great gem local businesses that I frequent as much as my pocketbook allows.
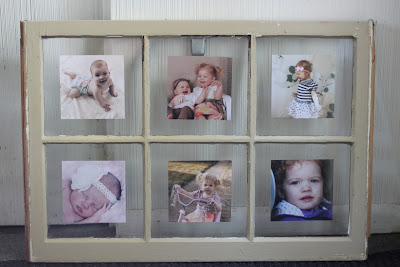
Eco Chic Boutique is one of those amazing little local places that make Fargo a place where hipster crafters can feel at home. It's also where I picked up this dandy window frame on sale for just a few bucks. I love the look of a scratched up old window pane. I had to snatch it when I saw it, though I had no idea at the time what I was going to do with it. It sat empty on a sad little open nail in our bedroom until a friend of mine posted this awesome window pane photo gallery on facebook so I had to make one of my own.
Here's how:
DIY Window Pane Photo Gallery
Supplies needed are simple. I just got some photos printed and used spray adhesive to attach them.
Step 1: I measured the glass panes inside the window and they were 7" square so I decided to print 5x7" prints and cut them down to 5" square.
Step 2: I created a quick corner template for myself with a 1" border so that it would be quick and easy to line up my photos in the center of each pane.
Step 3: I set the window face down on the table and lined up my template in the first pane.
Step 4: I lightly sprayed the front of each photo (yes, the front! ah!) with spray adhesive. I let them dry for a second to make the adhesive removable (follow package directions on your glue) and placed the picture in the pane along the template.
I tested the photos to make sure they could be removed easily so that I could switch them out when I wanted. I also tested to make sure that the glue didn't show on the pictures from the front. You can kind of see it for extreme angles but not when you're looking face on.
What a great way to display your favorite pictures!
 I printed 5x7 photos to fit in my 7" panel openings.
 Then I cut the images down to 5" squares to create a 1" border around the picture inside the window pane.
Trusty spray adhesive! I love this stuff.
Be sure to spray the front of the picture to stick it in the frame.
I created a corner template with 1" on each side to easily place my picture centered in the frame.
Placing the picture
There it is! A beauty for just a few bucks--$5 window pane, $5 worth of photo prints and a touch of spray adhesive.
Ta Da!


The website is looking bit flashy and it catches the visitors eyes. Design is pretty simple and a good user friendly interface.jogos friv gratis 2019
ReplyDeleteJogos 2019
jogos friv
jogos io net