Monday, January 28, 2013

Super Simple Tomato Pasta


It’s a cold, blizzarding night in Minnesota… you know what that means… time to throw on the sweats, hunker down inside and watch the snowflakes fall. Enjoy it before you have to don the boots and head out to shovel!
 
 my snowy cold backyard tonight

Cold weather and being stuck inside means one other thing—an easy pasta meal.

We love to cook! A few years ago Carl and I decided to cut down on processed food and try harder to make our own meals. It’s been an awesome journey with some fun mistakes, great memories and more than a couple bottles of wine. 

One of our favorite go-to recipes is a super simple pasta recipe from Rachel Allen. It’s made mostly from kitchen staples with a bit of fresh rosemary and some freshly grated parmesan (which has become a kitchen staple in our house!) Her recipe calls for spicy chorizo sausage. It’s awesome but we’ve tried different meats with it and anything goes! The sauce is really the star of the show.

The beauty of this recipe is that once you’ve got your ingredients prepped, you can get it rockin’ on the stovetop, throw the pasta in to boil and by the time the pasta is done, so is your sauce. A true 30 minute dinner. 

Here goes… try it and I promise you’ll never smother that precious pasta with a jar sauce again.

Tomato Pasta with Cream

2 tablespoons butter or olive oil (or a little of both)
2-28oz. cans of diced tomatoes (you can use fresh, too… but save yourself the trouble. ;)
4 cloves garlic, grated or finely chopped
2 teaspoons chopped fresh rosemary (not a rosemary fan? try 2-3 tablespoons of fresh basil)
a pinch of sugar
a pinch of dried red chili flakes
¾ cup cream
2 tablespoons chopped parsley
4 tablespoons freshly grated parmesan
8oz. chorizo sausage (or other protein of your choice...or none at all)
1 pound of pasta (penne, rigatoni, bowtie…whatever you like really!)
Directions:

1. Melt the butter or olive oil in a large saucepan and add the chopped tomatoes, garlic and rosemary. Season with salt and pepper and a pinch of sugar. Simmer together to combine the flavors, about 5 minutes.

2. Add the chorizo (or whatever protein you choose or none at all!) to the pan with the chili flakes, cream and half the chopped parsley. Simmer with the lid off until the mixture has reduced by half, about 10 minutes, stirring frequently. Take off the heat and check and adjust the seasoning. (a good tip when combining a milk product with acidy tomatoes--bring your milk/cream up to room temperature to give a lesser chance of curdling)

3. Meanwhile cook the pasta in a large pan of salted boiling water until it is slightly al dente (8-10 minutes). Once cooked, drain and toss with the sauce.

4. Plate the pasta in a big serving bowl and scatter with the grated parmesan cheese and the rest of the parsley and serve immediately.

This is great as a make-ahead meal. I always think it’s even better day two after the sauce has taken a day to soak into the pasta.

Walk away from the jar and try this one on! 


What else are the Johnsons up to on a cold boring night? 


GiGi has been kickin' it on her rolling! Tummy time is her new favorite thing. 

My daddy's girl Curly Girl snuggles with dad on the couch. Love that pout!

Monday, January 21, 2013

Monthly Onesie Project


At my baby shower for Curly Girl, I received a set of onesie stickers. It turned out to be one of my favorite gifts because it created an awesome memory for me of her first year. Each month I would plan an outfit and a background and take a million pictures of Curly Girl to get the perfect shot of her wonderful smile.

With my GiGi, I knew that I needed to do the project again and with all of my newly acquired sewing skills, I wanted to up my game. After the first month with just a plain iron-on number, I came up with the idea of doing monthly themed onesies. So for the second month (October), I created a pumpkin onesie and my Monthly Onesie Project was born!

For the first month before I started the project, I made the number 1 and a matching headband. Adorable, but clearly I could do better:


For October, a pumpkin:

For November, a turkey:


For December, a Christmas tree:


And now for January, a simple snowflake:


I’ve tried to keep it simple. After all, I remember with Curly Girl's stickers sometimes I struggled to just slap the thing on and get the pictures done. So here’s my basic process.

Step 1: Find an image to trace

I copied the image in Word and sized it to be about a 4-5” square so that it would fit on the onesie. I printed the image out and cut it into pieces.

Step 2: Trace the pieces backward onto fusible web.


Iron the fusible web onto the back of your fabric. I do this before cutting them out because you can cut both the fusible web and fabric out at the same time. This makes the fabric stiff and easy to cut, which is helpful especially for delicate patterns (like a snowflake!)

Step 3: Cut out the pieces from your fabric

That's pretty much it. :)
Step 4: Place your pieces and iron on to your onesie


Peel the paper backing off of your fusible and place the pieces where you want them on the onesie. A tip I learned after my first project...be sure to go down 2 or so inches from the collar to account for baby's double-chin. I made a stem for my pumpkin, only to find it swallowed up by GiGi's adorable chunky chin.

Step 5: Embellish as needed!


I generally sew a border around the edge of my shape to make sure it never comes lose from the fabric (although the snowflake had too many edges for that). I used a ribbon bow to decorate the simple pumpkin and made a ribbon tail for the turkey and glued on googley eyes. I put a star button at the top of my tree and used the rag-time fringing method to make my tree look more real. Use your creativity! (or a search on the internet or pinterest ;)

My goal with these onesies was to use whatever I happened to have in the house. So far I haven’t purchased anything to make my onesies. I’ve just used fabric scraps and whatever embellishments I had lying around.


To make the number, I cut a number out of a coordinating fabric and spray some adhesive on the back so that it temporarily sticks in place for the picture. Then I can remove the number and GiGi can wear it all through the month!


More to come as GiGi grows!


for February, a heart.

Sunday, January 20, 2013

My favorite DIY baby gift (part 3): Cloth Baby Shoes

If you recall, part 1 was a flannel blanket; part 2 was adorable burp clothes.


Do you want to get an ooooh..ahhhhh... out of every mouth at a baby shower? Make adorable shoes. 

That's it. People will freak. 


This shoe type is common and there are a ton of patterns out there. My inspiration and first pair came from a very simple pattern for FREE on the blog stardustshoes posted on Michael Miller Fabric's website.

I am proud to say that I've finally put together my own pattern and tutorial tutorial here! Check it out!


This was my very first pair.

I remember when I finished them I literally jumped for joy they were so adorable! I made them for a friend who has a love affair with owls and an adorable little gal so I couldn't wait for her to see them. Since then, I make a pair any chance I get. Once you've invested in the fusible web and lining fabric, you can really just make them with leftover scraps of any project.


To make a pair of shoes, you’ll need:
  • A scrap of a sturdy fabric--an 8x8ish square is about it (I like to use coordinating flannel if I'm making a full baby gift. I've also used home dec fabric. Cotton quilting fabric is okay too but not as thick and sturdy)
  • A scrap of fabric for the interior lining of the shoe. (you could just use your same flannel here)
  • A scrap of fusible web (e.g. wonder under)
  • Two 8" lengths of 1/8" elastic
  • Matching thread
  • A sewing machine
The stardust pattern is for 0-6 months (which is truly more like 3-6 months). The trouble with making anything sized for babies is that they grow out of it so darn quickly. I've experimented with making the shoes in a variety of sizes and resizing them is actually pretty simple.

The stardust pattern will result in a shoe with a 4" sole. To adjust it, just photo copy the pattern and increase it by 10% for each size up you want to go. There are a lot of sizing charts out there but adjusting the sole by 1/2 inch seems to be pretty standard:

0-3 months = 3.5" sole
3-6 months = 4" sole
6-9 months = 4.5" sole
9-12 months =5" sole
12-18 months = 5.5" sole

I've made a few shoes for kids 12 months and up used gripper dot fabric for the bottom sole so that they're not on a slippery surface if they are standing or walking. Love this! ...but watch your sewing machine with that fabric. I broke a few needles on my first pair.

Enough with the writing... let's just oooh, ahhh at some adorable shoes.


Friday, January 18, 2013

My favorite DIY baby gift (part 2): Thirsty Burp Clothes

If you recall, part 1 was a flannel blanket; part 3 was adorable baby shoes.


Now get real with me mommies… Have you ever found a really nice store-bought, manufactured burp cloth?

I never have. Sure, folks use folded up blankets or towels or pre-fold cloth diapers… but the secret to having nice burp clothes is to find someone who sews and get them to make one of these easy projects.

I’ve made several types of burp clothes in my day (more tutorials to come!) but these are my mommy-tested favorite. I call them “Thirsty Burp Clothes” because with three layers of absorbent cloth, these babies will soak up crazy messes. (Just ask me about the puking incident at church. ew.)

Here's how:

To make two burp clothes, you’ll need:
  ¼ yard of flannel fabric (again, you can use other fabrics but flannel absorbs best. You'll see I
       inserted a chevron fabric here this is actually duck cloth canvas)
  ¼ yard of terry cloth (chenille is another nice fabric but less absorbent and more $$)
  A small package of natural cotton batting (e.g. “Warm and Natural”; you can buy it by the
       yard too but a crib size package will cost you $10 and last for a long time)
  Matching thread
  A sewing machine (or a needle and a lot of time ;)


Version 1: Sewn Edge
Step 1: Cut your pieces


For each burp cloth, cut one piece of flannel, one piece of terry cloth and one piece of batting. There’s no need to be crazy meticulous here. I think it’s fine to stack the fabrics and whack them with a rotary cutter if you have one. You can also trace the pattern with a marking pen and cut them out with scissors. Copy my pattern onto a 8.5x11 sheet of paper and either cut from the fold or, like I did, trace the full pattern onto a paper bag or whatever.

I have two different versions* cut from the same materials. I’ll show the more traditional version first. I’ll also say you don’t HAVE to include a batting layer. Most tutorials of this type of burp cloth just use two layers of flannel…but let me tell you, it’s worth it. They’re softer, prettier and WAY more absorbent than just two layers of flannel.

*I apologize in advance that I insert a chevron fabric for my tutorial... still learning how many photos to take so I had to supplement. :)

Step 2: Arrange your fabric


Stack your fabrics: terry cloth, flannel (with the right side facing down), batting.

Step 3: Sew!


Okay, if you’re the meticulous sort, you should probably stop and pin your fabrics together here. I am not a pinner (at least… not that kind of pinner.) So I just stack and sew and do my best to keep my fabrics lined up as I go. I use a standard ¼” seam (the edge of your presser foot) for pretty much everything.

Be sure to leave a small gap (2-3”) along one of the long sides so that you can turn your fabric right sides out. Now, I am a backstitcher. Whenever I begin a seam where I will be leaving a gap, backstitch a few stitches when you begin and do the same when you approach your gap.

Step 4: Trim excess fabric


Trim the excess fabric around your seam down to 1/8” of an inch or so, being careful not to cut into your seam. When you reach your gap, leave a bit more of the fabric so you have enough to neatly fold in when you sew your finishing seam.

Step 5: Turn right sides out and press


Stick your fingers in through the gap and turn your fabrics right sides out. If you stacked your fabric correctly, your batting should be in the middle with your flannel and terry cloth visible from the outside.

Use the end of some stick-like object (the eraser side of a pencil, the end of your scissors, whatever you have hand), to gently push at your seam from the inside to make sure your seams are totally turned out.

Iron your fabric with a hot, hot iron to flatten it and prepare it for your finishing seam. Neatly tuck in and press the fabric at your gap so that it fits in with the rest of your seam.

Step 6: Sew your finishing seam

Starting near your gap, sew a border about a ½” from your edge all the way around. You can use a cute zig zag or decorative stitch here. I also like to fold my burp cloth in half hamburger style and mark the fold with a marking pen and sew a seam right through the middle. It looks nice and just makes the burp cloth fold a little nicer.


Trim your excess threads and you’re done!


Version 2: Fringe Edge

This may be a little less traditional for an edge but I like it because it creates a fluffy look and a softer edge. I love the look and feel of rag-time quilts so tried it on a burp cloth and loved it!

Step 1: Cut your pieces

Same as above

Step 2: Arrange your fabric


This time there are no hidden seams so you stack your fabric exactly as you want it in the finished product: terry cloth, batting, flannel (right side out)

Step 3: Sew!


In this case, I use about a 1/2" seam allowance to allow for the fringing. Again, you can pin the fabric but you know how I feel about that. Just throw the thing on your machine and trust yourself to keep your edges together. As Julia Child said, “{sewing} is like love, it should be entered into with reckless abandon, or not at all”

Step 4: Trim excess batting


Fold the flannel and terry cloth back and use scissors to carefully trim the batting right down to the seam. You will want to keep the excess flannel and terry cloth. See in the first picture the batting sticking out on the right. On the right side picture, the batting has been trimmed away.

Step 5: Fringe the fabric


Using your scissors, carefully cut into the excess terry cloth and flannel every quarter inch or so. Go all the way around your project being careful not to cut into the seam.  

Step 6: Wash it


Wash and dry your burp clothes once or twice to allow the fabric to fray to get that softer edge. The first picture is the fringed burp cloth unwashed. The second picture shows the difference after one washing. You may need to trim your terry cloth a little after washing because it frays differently than the flannel. 


Done!

Wednesday, January 9, 2013

My favorite DIY baby gift (part 1): Mitered Corner Blanket


I grew up with two creative parents who were always up to something with new hobbies. I didn't realize the bug had hit me until I bought myself a silly $100 sewing machine and starting sewing little things for during my first pregnancy. There were a million DIY baby projects out there--from blankets to burp clothes--and I just had a try a few myself.

Since then I have developed what has become pretty standard for me as a homemade baby shower gift—a mitered corner blanket, some homemade burp clothes, a pair of baby shoes (and whatever else strikes my fancy at the time.)

First up… the Mitered Corner Blanket.

 
Ooh—I love this project. I received one of these from my mom at my baby shower for Miss M. It’s two layers of coordinating flannel fabric. With bright, bold fabrics, it’s so beautiful and has a great purpose too! For newborns, it’s a square blanket of a good size so it’s perfect for swaddling. When little one (LO) gets older, it’s a great size for a toddler “blankey”. Flannel is durable, soft and doesn’t stain easily. Miss M has sent hers through the ringer and it’s still holding strong.

BONUS—while striking and beautiful and sure to be a show-stopper at your baby shower, it’s also a 90 minute or less project.

My inspiration? This idea didn’t come out of thin air. Here are a couple of other tutorials I used when first making this project: USU Extension and donswife blog.

What you’ll need:
2 coordinating flannel fabrics (you could use other fabrics of course but I LOVE flannel for this)
  -1 yard of one*
  -1 ¼ of the other
Matching thread
A sewing machine
*P.S. if you’re making all three of my DIY baby gifts, I usually buy 1 ½ yards of each)


Step 1: Cut your fabric

Cut your two pieces of fabric into squares so that one is 10 inches larger than the other. Say, 40" x 40" and 30" x 30". The manufactured width of your fabric is probably between 40-42" so that will likely decide your maximum size.


Step 2: Center fabric edges together

You will need to center the smaller square sides with the larger square sides. This will create perfect border all around.

Now I have to admit here that I hate pinning my fabric… so here’s how I do it. Choose your first side to meet together and fold in half. Put a pin at the center of the smaller fabric. Now repeat with the larger fabric. With RIGHT SIDES TOGETHER pin the two fabrics together where you marked the centers. Match up the edge (flannel is nice because it will stick together without needing to do extra pinning). Of course, you’ll find the larger fabric will be five inches longer on the top and bottom of each side.


fold fabric in half to find the center

 pin at the center

 two center pins meet. pin fabrics together here. 


Step 3: Sew edges together

Starting 1/4" in (again right sides together), sew the edges together with a 1/4" seam. End 1/4" inch from the end. You leave the ¼” on each side to make room to sew at each corner. Don't worry if there are some minor gaps. Your finishing seam will close everything up.

Repeat for the two more sides. Pin the centers together. Match the edges. Sew the edge leaving ¼” at each end. 
sewing edges together

Step 4: Finishing the last side

Repeat the same process for centering and placing your fabric on the fourth and final side. Instead of sewing all the way down the seam, you will need to create a gap in the seam where you will turn the blanket right sides out. 

The gap will be easily hidden when you complete the finishing seam so give yourself plenty of room here. I usually leave a 4-5" gap. Double-pin 2-3" away from your center pin on either side as a reminder to yourself to stop when you're sewing. Backstitch a few stitches when you reach your double-pins. 

center pin and double pins on each side

Step 5: The corners

Once you have your four sides sewn together, you’ll see the border has formed and you have a good idea of what the blanket will look like (inside out). Now you've got to deal with the "floppy corners" and make them into the perfect mitered corner!


what your "floppy corners" looks like with the four sides sewn


Now I’ve looked at A LOT of tutorials on making this blanket. The corners seem to be the most confusing part so I hope I don’t add to the confusion and instead simplify it.

close up of the floppy corner

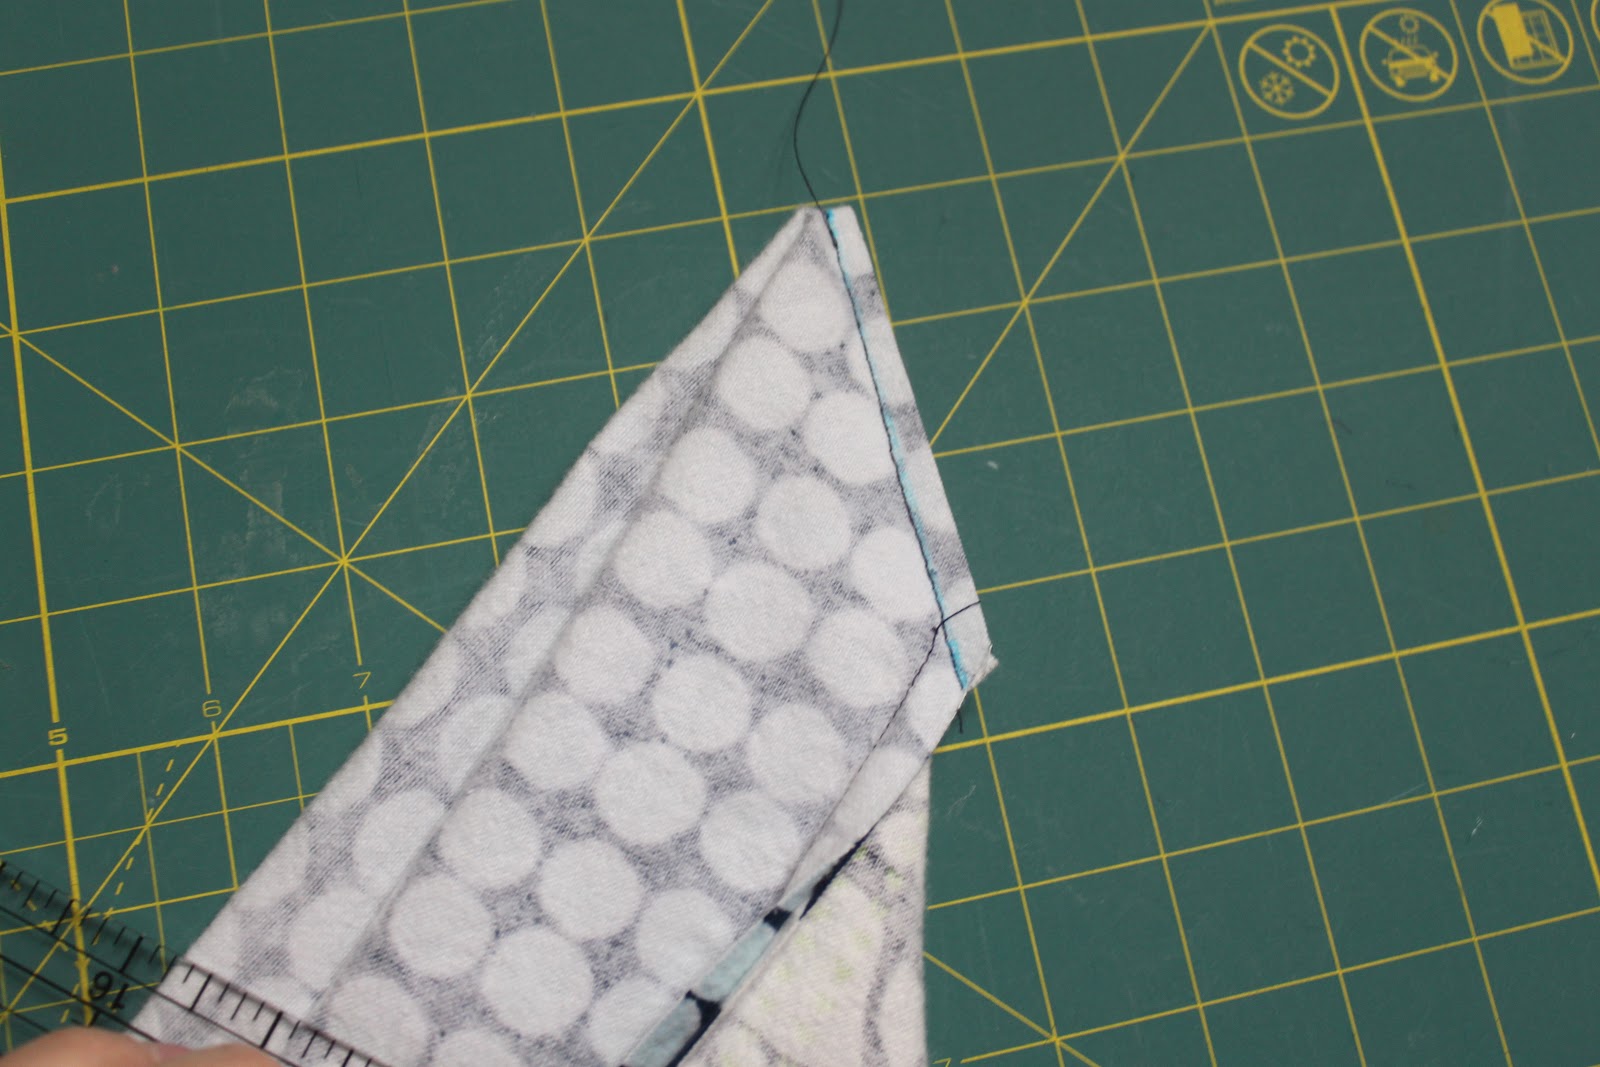
Here’s what you do… Fold your corners edge-to-edge diagonally (like you're forming a triangle with the blanket). Hold the long edge vertically. If you have a ruler mat, it’s handy to place it along a straight line. Place a ruler or straight edge from the end point of your seam to the folded edge to create a 90-degree angle. If you have a marking pen, draw a line along your straight edge. Pin along the line and sew your seam along this line for each corner. 


front view of folding the corner together 

folded and flat along a straight edge. draw line to create
a 90-degree angle.

 Once you’ve sewn your corner seam, trim the excess fabric from the corner. Before you trim you can flatten your blanket out and check to make sure the corners look right. 

 
trimming the floppy corner fabric


 your successful mitered corner


Step 6: Iron your interior seams

Iron the corners seams open and the inner square edges toward the inner square.

iron corner seams open

(p.s. a new ironing board cover is on my short list of projects. ignore the water stains. ew. :O)


Step 7: Turn your blanket right sides out & press


Reach in through the gap you created along the one side. Grab each corner and pull your blanket right side out. Be sure to really poke at the corner so you get a nice square corner. Work at your blanket to make sure your borders are even. (The more your pull at your corners, this should happen pretty naturally.) Find the gap and press the seam so that it fits in with the rest of your seams.

Take the time to press the outside edges of your blanket. This will make it easy to sew your finishing stitch on the interior border and will keep the borders nice time after time when washing. 


Step 8: Sew your finishing seam

Now that your blanket is all pressed. Sew a zig zag stitch or other decorative stitch along the seam of the inside square to finish and secure your border. I would recommend starting with your gap so that you know it's closed with your zig zag stitch. Then you can fly through the rest of the seams.**
 line up your sewing foot right in the middle of the seam 
between the border and small square


a close-up of border stitching


Trim your threads and you're done! 
 
Ta-da!


**If you don't know this trick, I feel it is my responsibility to share... when you approach the corner between two sides, DO NOT end your seam and take your project off of the machine. Instead, carefully approach the corner with the needle and stop right at the corner and lower your needle into the fabric. Lift up your pressure foot and turn your fabric 90-degrees and begin sewing down the next edge. This way you can sew the entire border without having to stop. Be sure to overlap just a few stitches to secure your seam.

If you already knew this, your momma taught you well.