Showing posts with label pinspired. Show all posts

Saturday, March 5, 2016

Little Man's Nursery


Boy do I love decorating nurseries. Babies and all of their tiny adorable things. I love to search through pinterest to find all of the new theme ideas with 100 interpretations for each. After we finished transitioning our little girlies into their new girly room, it was time to get started on our preparations for little man. We knew our Bemidji babe needed a proper North Woods theme so I went the direction of woodland animals. 

As usual, I did my best to reuse and repurpose where ever I could. His changing table and this shelf were originally purchased at IKEA for Curly Girl's nursery. I loved the idea of displaying some of his adorable woodland animal clothing on the hooks. 


I refinished this sad $10 craigslist find for GiGi's nursery. A fresh coat of white spray paint and a little grey fabric splurge turned this into a cozy little feature. I found a scrap of orange flannel at a local fabric store and turned it into a simple and fun fox pillow. 


Two of my favorite things in the room are this awesome birch tree feature wall and the cardboard deer head I bought at a local gift shop. I also loved the trendy pop of orange with this great arrow print fabric from Premier Prints. 

We squeezed in a day bed with some more pops of orange. 

The changing table

How cute is this little squirrel night light? It's too small put off any real light but was just perfect for middle of the night diaper changes.


My mother found cut outs from a quilt from a discontinued Carter baby line at a thrift store so we framed the fabric circles in embroidery hoops as a perfect way to feature some woodland animals without having a nursery of matchy-matchy baby items. 


The girlies clearly had a great time helping me hang them while they jumped on the daybed in their PJs and tutus. 


Sparkly glitter animal silhouettes in my boy's room? Yes. I reused some decor from our previous home's kitchen with the frames and chevron fabric. I had hot glued some brightly spray painted kitchen tools onto the fabric. I ripped those off and painted some fabric glue on that I covered in gold glitter. Another fun way to feature some DIY woodland animal art. 
My favorite--the deer antler silhouette


Of course I had to make my favorite mitered corner blanket with some fun woodland animal fabric and a super soft striped flannel. 

The before pictures--sad, poorly painted purple. 


Ready to paint!

The music notes. I celebrated painting over these… though I appreciate the previous owner's creativity. 
I found this AWESOME stencil from Cutting Edge Stencils. No doubt this baby is going to be used again. What a fabulous design and big enough that I only had to do eight sections to cover the wall. One afternoon to finish this beauty!
The finished wall. 
…and an Instagram filter makes it even more dramatic. 


There it is! My favorite room to date. 

Thursday, August 22, 2013

My monkey turns 1! Pinspired: Monkey Cupcakes


My GiGi turned one! Man, it's been a fast year. I can't believe it.

So playing the good mom I wanted to bring some cupcakes to daycare to celebrate the occasion but as usual I was short on time so I googled cute kid cupcake ideas and came across this wonderfully simple idea from bigflavors.  

Here's how: Monkey Cupcakes

Supplies needed:

  • a box of Nilla wafers
  • a box of mini Nilla wafers
  • chocolate chips
  • red and black gel icing
  • chocolate frosting
  • a cake mix and supplies


Bake, cool and frost the cupcakes with chocolate frosting. I wish I had a wonderful cake recipe for you here but to this day I still haven't found a homemade cake recipe that I like so I still use box cakes. (Please comment if you have one you love!)

Place a large Nilla wafer along the bottom edge for the mouth and nose. Cut a mini Nilla wafer in half and stick into the frosting along the top of the cupcake for ears. Place two chocolate chips just above the large wafer for eyes. Use the red gel icing to draw a mouth and black to draw two dots for a nose and pupils for the chocolate chip eyes. That's it! 

They were a huge hit at daycare! I was told I was the "cool mom" of the day--an award I'll take any day. 

I made a variation for the family birthday party when I ran out of chocolate frosting. Bears! 

To match the monkey cupcakes, I created a monkey smash cake. I baked two 6" round cakes that I layered and frosted. I baked a large sugar cookie for the mouth and used Nilla wafers for the eyes and ears.  

Smash cake was definitely a hit! 

Curly girl got in on the action too. 


Yum! Now time for a bath.

Not quite walking yet but so close! (... she made the big move one week later.)

 Maybe it's cruel of me but I love a crying birthday picture.


Wednesday, May 29, 2013

Pinspired: Kale, Strawberry, Avocado Salad


I've decided to take a break from my Make-Ahead Mondays series for the summer. As much as I love a make-ahead meal, there's just something about summer and desiring nothing but simple, fresh meals. 

Confession... We have been itching to go on a health kick and after having a few conversations about vegetarianism, juicing, raw foods, etc. with some folks we know, we decided to buy in. We watched the documentary Fat, Sick and Nearly Dead. Great stuff! ...so convincing that we went out and got ourselves a juicer and made the great attempt for a 10 day juice fast. Epic. Fail. We made it for two days but were too drained to continue so I decided to stick with the juicing for breakfast and lunch but make mostly raw vegetarian dinners to supplement. (Sorry, Joe Cross!) It's been a neat change and I think juicing is something I might try for a while. 

I came across this awesome pin from Two Peas & Their Pod for 20 of their favorite summer salads. I was so inspired looking at their awesome colorful pictures. I had the kale and strawberries so this was my first pick. 

Kale, Strawberry & Avocado Salad
original recipe by Two Peas & Their Pod
yields 4 small salads or 2 dinner salads

Ingredients:
4 cups chopped kale, stems removed
1 cup sliced strawberries
1 avocado, chopped
1/3 cup nuts (whatever you like. I happened to have pecans)
1/4 cup feta cheese

Lemon Poppyseed Dressing:
2 TB extra virgin olive oil (grape seed oil is also AWESOME for salad dressings)
2 TB fresh squeezed lemon juice
1 teaspoon honey
1/2 teaspoon poppyseeds
1/8 teaspoon salt
1/8 teaspoon fresh cracked pepper

Pile up your plate with kale. (We found this awesome bag of mixed baby kale at Costco.) Sprinkle the strawberries, avocado, nuts and feta cheese on top. Sprinkle with a little sea salt and fresh cracked pepper. 

To make the dressing, combine the ingredients in a small container with a tight lid and shake it like crazy. I used my handy, dandy Magic Bullet (but failed to think about adding my poppyseeds after the fact so they got a little crushed. Oops.)

Drizzle a little more than a tablespoon of dressing over your salad. 

What a great treat for a quick weeknight dinner!

Enjoy!


Lemon Poppyseed Dressing
What an awesome salad dressing from fresh ingredients!

Saturday, April 13, 2013

Pinspired: Grocery Bag Holder

My sweet sister in law pinned these neat couple of projects on one of my boards so I just had to take up the challenge and make them for her. 

Fabric Grocery Bag Holder

Remember these? I remember one Christmas about 20 years ago my aunt made them out of kitchen towels for all of the families. Of course I didn't think that much of it then but now that I've got a family of my own, I realize, hey, this is pretty handy! ...and with today's beautiful fabrics, you can proudly display your old plastic grocery bags in a beautiful holder.

The pin was from a wonderful blog Make It and Love It

Supplies:
1 piece of fabric 20x25 inches (or a combination of fabrics sewn together. I used Make It and Love It's measurements exactly but if you are a little short, no worries. I think the bag could go smaller.)
2 pieces of narrow elastic (1/4inch or smaller. I used 1/4inch.) Cut 11 inches and 6 1/2 inches
1 piece of ribbon 14 inches long
Matching thread

Here's how you do it:

Step 1: Cut your fabric

Again, you're trying to achieve a piece of fabric 20x25 inches. I didn't have quite enough of my striped fabric so I added a coordinating floral for the top and bottom. I cut my striped fabric 19.5x20 then I cut two additional strips 3.5x20. The extra half inch was for my seam allowances when adding the extra strips.


Step 2: Sew your pieces together

Sew two simple seams to attach your top and bottom if using multiple fabrics. Obviously skip this step if you're only using one fabric.


Be sure to iron your seams open like a good little sewer to prepare for the next step.

Step 3: Create a casing for your elastic

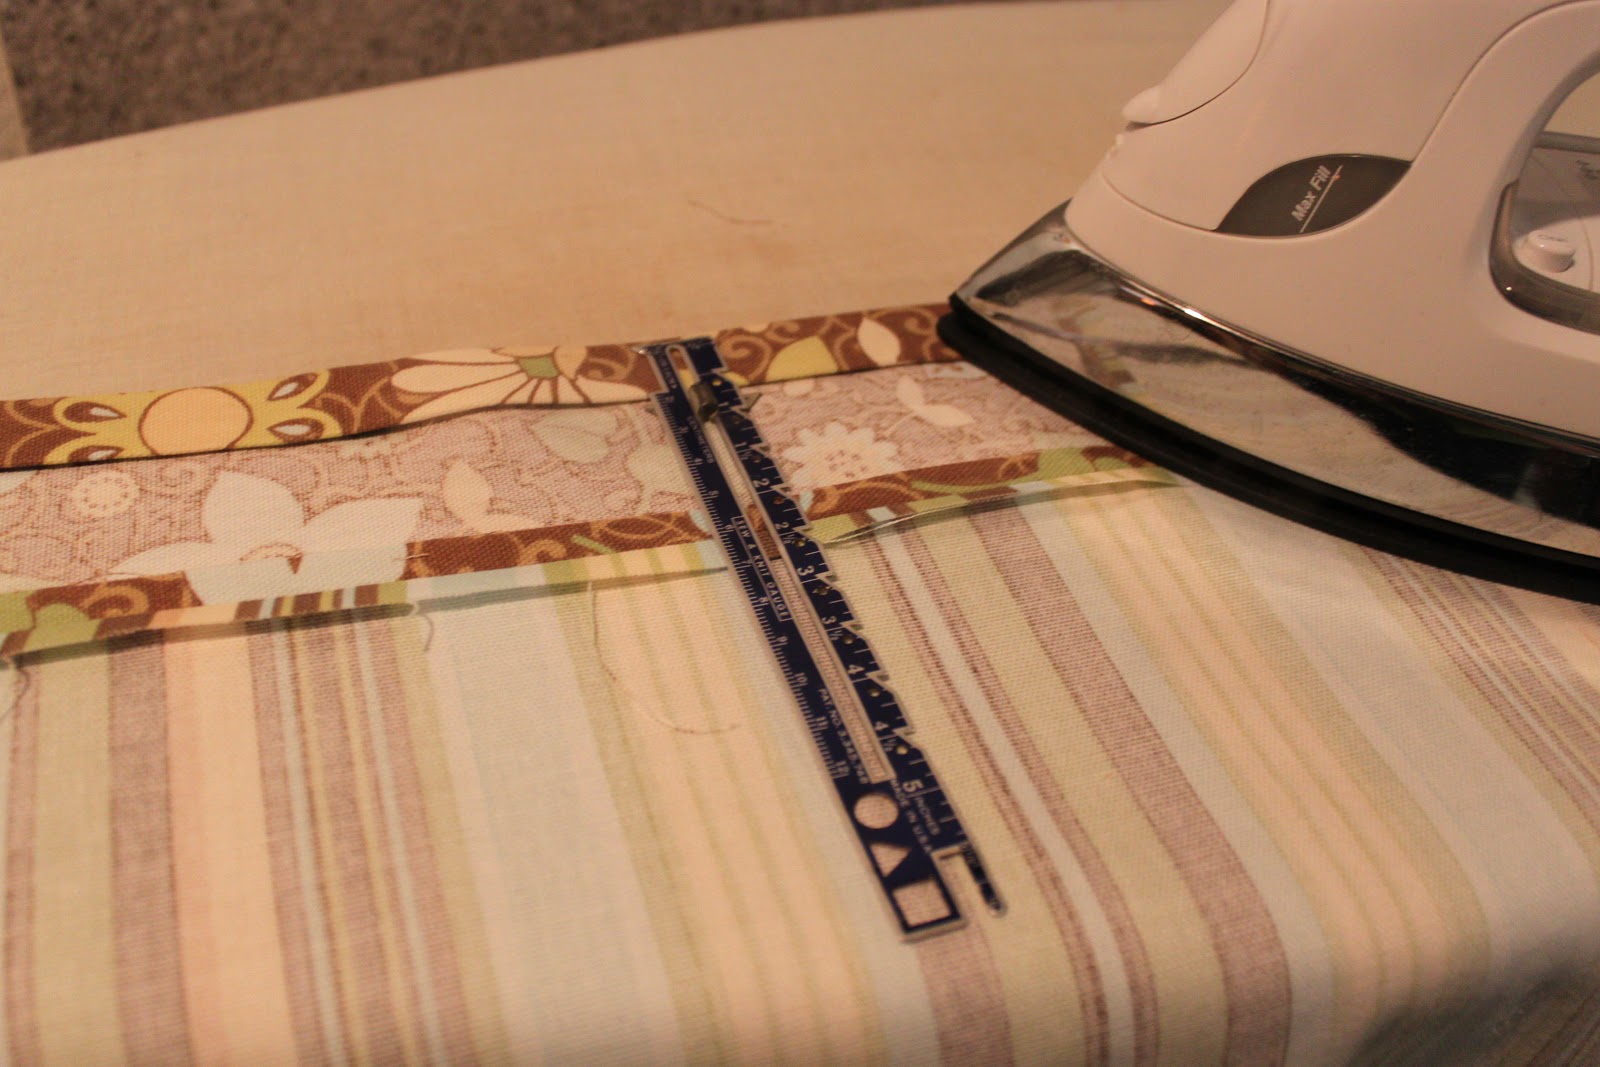
Using a nice hot iron, fold over each side of your fabric top and bottom about a 1/4 inch and press. Fold it over a second time for a 1/2 inch (or more if you want more room to fit your elastic through) and press again. Sew along the inside edge to create a pocket to run your elastic through.


night sewing if you can't tell by my total lack of light
of course that's when I get most of my work done. :)


Step 4: Place your elastic

Attach a safety pin to one end of your elastic and push it through your casing. Be sure to keep hold of the other end of your elastic. It will stretch as you go and bunch your fabric up. Place your 11" elastic on one side and the 6.5" on the other. Take a minute on each side to place a couple of stitches at each end of the casing opening to secure your elastic in place. 


Step 5: Sew your long seam

Match your long sides with right sides together and sew the seam to create a big tube. I struggled a little with the elastic here since the top and bottom of the project were already bunched up. 

ALTERNATIVE: I wanted to make it just like Make It and Love It but I think the next time I make one I'll do my elastic casing the more traditional way like you would with an elastic waist on pants or a skirt. In this case, you would sew your long seam first to create a tube. Then iron under your fabric as in step 3 to create the casing for your elastic. Sew along the inside edge to create your opening for the elastic. Leave a gap in the seam to run your safety pin and elastic. Sew the two ends of your elastic together to form a loop. Stitch your gap closed. 


Here are the two ends with the elastic run through the casing and attached. You can see how the bunched up elastic can make sewing this a little challenging, especially if you're trying to neatly line up your seams.


I forgot to take a picture of matching up my seams... but here's the project after your seam is sewn and your project is turned right sides out. 


Step 6: Attach your ribbon handle

Cut a piece of ribbon 14 inches long. Fold over about a 1/4 inch on each end and pin on opposite sides of the opening with the 11 inch elastic. I used a zig-zag stitch to attach the ribbon to your project. This (obviously) will be the top side of your bag where you'll stuff your bags. The bottom end with the 6 1/2 inch elastic will be where you pull your bags out. The small opening will only allow one bag to come out at a time. 


Amazing, huh? 

Timeclock: This project only took me about 30 minutes!

Wednesday, February 20, 2013

PINSPIRED: Salted Caramel Chocolate Chip Cookies


I've been trying to think of some regular features for my blog and I was "inspired" by some pinterest ideas I've run across so I thought "PINSPIRED" might be a nice tagline. 

A couple of weeks ago I had at least a half dozen friends pin the same cookie recipe for Salted Caramel Chocolate Chip Cookies. Salted caramel is all the rage and I needed to bring something to a superbowl party so I thought I'd give it a shot. 


Yum! 


...is about all I can say about them. Rave reviews!


I’ve included the original recipe below, but basically:
  1. Mix a batch of your favorite chocolate chip cookie recipe.
  2. Cut a fun-size Milky Way Simply Caramel in half.
  3. Dip the open end in sea salt (secret? I just used regular table salt).
  4. Cover the candy with your cookie dough and form into a ball.
  5. Sprinkle the top with a little more salt (I used kosher salt on top).
  6. BAKE! (325 for 17 minutes)


A few tips: I went according to the recipe but the recipe dough is a little buttery for me so the cookies were more flat and crunchy than mine usually are. Next time I think I’ll try my own favorite cookie batter and see how it goes. Just a preference thing. Trust me...there were no complaints about the awesome result of the original recipe.

Also, I wasn’t sure how much cookie dough I should use with the candy so my first batch I used too much. My cookies were flat and the caramel was a little lost. I would recommend using as little cookie dough as you can to just cover the candy—about golf ball size in all.

Try it out! I promise you won’t be disappointed.


Milky Way Salted Caramel Chocolate Chip Cookies

Ingredients:
Milky Way Simply Caramel fun-sze (I used two bags of the fun-size)
4c flour
1ts baking soda
1t salt, (sea salt preferred) and extra for dipping your candy
1 ½ c unsalted butter, melted
2c brown sugar, packed
1c granulated sugar
1TB vanilla extract
2 eggs
2 egg yolks
3c semi-sweet chocolate chips (or milk chocolate if you’re a totally sweet tooth like me)

Directions:
Sift or whisk together the flour with your salt and baking soda, set aside.  Cream together the melted butter, brown and granulated sugar.  Once incorporated, beat in the eggs, then vanilla.  After the wet ingredients are combined, add in your dry ingredients.  Mix until just combined and then add the chocolate chips, gently stir them in. 

Cut the Milky Way candies in half, dip them into sea salt to seal the open caramel end.  Take a ball of dough, just big enough to cover the half-bar, add more dough if needed.  Roll into a ball and sprinkle the top with more sea salt.


Bake at 325 degrees for 17 minutes with 12 cookies per sheet.  Let cool before transferring to a cooling rack.