
I grew up with two
creative parents who were always up to something with new hobbies. I didn't
realize the bug had hit me until I bought myself a silly $100 sewing machine
and starting sewing little things for during my first pregnancy. There were a
million DIY baby projects out there--from blankets to burp clothes--and I
just had a try a few myself.
Since then I have
developed what has become pretty standard for me as a homemade baby shower
gift—a mitered corner blanket, some homemade burp clothes, a pair of baby shoes
(and whatever else strikes my fancy at the time.)
First up… the Mitered
Corner Blanket.
Ooh—I love this project. I received one of these from my mom at my baby shower for Miss M. It’s two layers of coordinating flannel fabric. With bright, bold fabrics, it’s so beautiful and has a great purpose too! For newborns, it’s a square blanket of a good size so it’s perfect for swaddling. When little one (LO) gets older, it’s a great size for a toddler “blankey”. Flannel is durable, soft and doesn’t stain easily. Miss M has sent hers through the ringer and it’s still holding strong.
BONUS—while striking and
beautiful and sure to be a show-stopper at your baby shower, it’s also a 90 minute or
less project.
My inspiration? This idea
didn’t come out of thin air. Here are a couple of other tutorials I used when
first making this project: USU Extension and donswife blog.
What you’ll need:
2 coordinating flannel
fabrics (you could use other fabrics of course but I LOVE flannel for this)
-1 yard of one*
-1 ¼ of the other
Matching thread
A sewing machine
*P.S. if you’re making
all three of my DIY baby gifts, I usually buy 1 ½ yards of each)
Step 1: Cut your fabric
Cut your two pieces of fabric into squares so that one is 10 inches larger than the other. Say, 40" x 40" and 30" x 30". The manufactured width of your fabric is probably between 40-42" so that will likely decide your maximum size.

Step 2: Center fabric edges together
You will need to
center the smaller square sides with the larger square sides. This will create perfect border all around.

fold fabric in half to find the center

pin at the center

two center pins meet. pin fabrics together here.
Step 3: Sew edges together
Starting 1/4" in (again right sides together), sew the edges together with a 1/4" seam. End 1/4" inch from the end. You leave the ¼” on each
side to make room to sew at each corner. Don't worry if there are some minor gaps. Your finishing seam will close everything up.

sewing edges together
Step 4: Finishing the last side
Repeat the same process for centering and placing your fabric on the fourth and final side. Instead of sewing all the way down the seam, you will need to create a gap in the seam where you will turn the blanket right sides out.
The gap will be easily hidden when you complete the finishing seam so give yourself plenty of room here. I usually leave a 4-5" gap. Double-pin 2-3" away from your center pin on either side as a reminder to yourself to stop when you're sewing. Backstitch a few stitches when you reach your double-pins.

center pin and double pins on each side
Step 5: The corners
Once you have your four
sides sewn together, you’ll see the border has formed and you have a good idea of what the blanket will look like (inside out). Now you've got to deal with the "floppy corners" and make them into the perfect mitered corner!

what your "floppy corners" looks like with the four sides sewn
Now I’ve looked at A LOT
of tutorials on making this blanket. The corners seem to be the most confusing
part so I hope I don’t add to the confusion and instead simplify it.

close up of the floppy corner
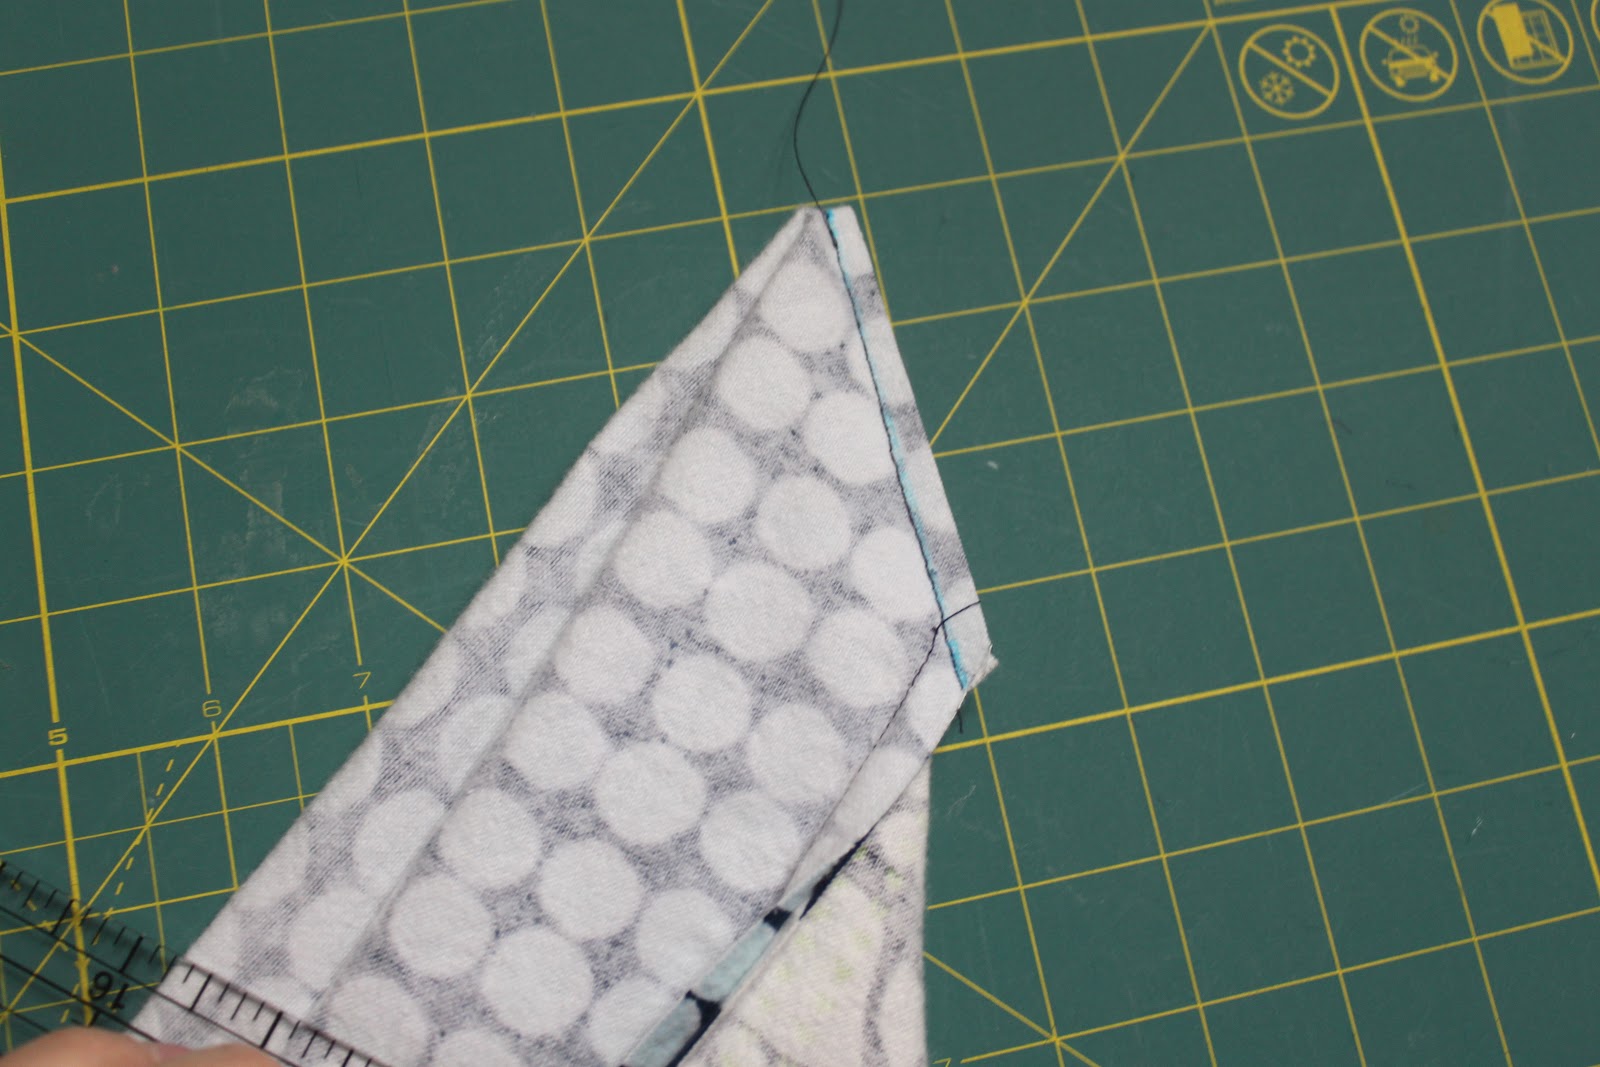
Here’s what you do… Fold
your corners edge-to-edge diagonally (like you're forming a triangle with the blanket). Hold the long edge vertically. If you
have a ruler mat, it’s handy to place it along a straight line. Place a ruler or straight edge from the end point of your seam to the folded edge to create a 90-degree angle. If you have a marking pen, draw a line along your straight edge. Pin along the line and sew your seam along this line for each corner.

front view of folding the corner together

folded and flat along a straight edge. draw line to create
a 90-degree angle.
Once you’ve sewn your corner seam, trim
the excess fabric from the corner. Before you trim you can flatten your blanket out and check to make sure the corners look right.

trimming the floppy corner fabric
your successful mitered corner
Step 6: Iron your
interior seams
Iron the corners seams
open and the inner square edges toward the inner square.

iron corner seams open
(p.s. a new ironing board cover is on my short list of projects. ignore the water stains. ew. :O)
Step 7: Turn your
blanket right sides out & press
Reach in through the gap
you created along the one side. Grab each corner and pull your blanket right
side out. Be sure to really poke at the corner so you get a nice square corner.
Work at your blanket to make sure your borders are even. (The more your pull at
your corners, this should happen pretty naturally.) Find the gap and press the
seam so that it fits in with the rest of your seams.
Take the time to press
the outside edges of your blanket. This will make it easy to sew your finishing
stitch on the interior border and will keep the borders nice time after time when
washing.
Now that your blanket is all pressed. Sew a zig zag stitch or other decorative stitch along the seam of the inside square to finish and secure your border. I would recommend starting with your gap so that you know it's closed with your zig zag stitch. Then you can fly through the rest of the seams.**


line up your sewing foot right in the middle of the seam
between the border and small square
a close-up of border stitching
Trim your threads and you're done!
Ta-da!

If you already knew this, your momma taught you well.
Wow....... DIY?? Kinda hard......
ReplyDeletewww.littlekids.com.my
DIY Baby Shower Gifts........ Full of Mama's love.......
ReplyDeleteTake the time to press the outside edges of your blanket. This will make it easy to sew your finishing stitch on the interior border and will keep the borders nice time after time when washing. silk dupatta collection , two piece suit for ladies in pakistan
ReplyDeleteEN SON ÇIKAN PERDE MODELLERİ
ReplyDeleteMOBİL ONAY
TÜRK TELEKOM MOBİL ÖDEME BOZDURMA
nftnasilalinir
ANKARA EVDEN EVE NAKLİYAT
trafik sigortası
dedektör
websitesi kurmak
Aşk romanları
smm panel
ReplyDeletesmm panel
İS İLANLARİ
İnstagram Takipçi Satın Al
HİRDAVATCİBURADA.COM
WWW.BEYAZESYATEKNİKSERVİSİ.COM.TR
servis
tiktok jeton hilesi
Congratulations on your article, it was very helpful and successful. bd3afc78b0791bdb97903e0fed31b995
ReplyDeletewebsite kurma
numara onay
sms onay
Thank you for your explanation, very good content. 63fcde8c8b2554d2e7b6627fc0d3fc0f
ReplyDeletedefine dedektörü
Good content. You write beautiful things.
ReplyDeletehacklink
vbet
mrbahis
vbet
taksi
korsan taksi
mrbahis
sportsbet
sportsbet
Success Write content success. Thanks.
ReplyDeletekıbrıs bahis siteleri
canlı poker siteleri
deneme bonusu
canlı slot siteleri
kralbet
betmatik
betturkey
amasya
ReplyDeleteantakya
edirne
elazığ
kayseri
U87B
https://saglamproxy.com
ReplyDeletemetin2 proxy
proxy satın al
knight online proxy
mobil proxy satın al
GD0O
Your DIY baby gift featuring mitered corner blankets is simply adorable! I love how personal and heartfelt handmade gifts can be, especially for little ones.
ReplyDeletepromocodehq
Thank you for sharing your wonderful DIY baby gift idea, and for those who enjoy adding a touch of creativity to their lives, don't forget to explore the world of frugalishness for some exciting discounts.
ReplyDelete"Kudos to the author for the consistent quality of content. Each blog post feels like a well-crafted piece of art, and the dedication to maintaining such high standards is truly commendable."
ReplyDeletewingstop coupon code $5 off
"Kudos to the blog for addressing not only the 'what' but also the 'why.' The thoughtful exploration of underlying motivations and implications enriches the content and elevates it to a deeper level."
ReplyDeletehttps://savingcentstogether.com/promotions/denny-senior-discount
"A big shoutout for the blog's commitment to social responsibility. The inclusion of articles addressing important societal issues demonstrates a dedication to using the platform for positive impact and change."
ReplyDeletejem city discount code
HNMHGMHBJUMK
ReplyDeleteشركة تسليك مجاري
<a href="https://altaiyar.com/%d8%b4%d8%b1%d9%83%d8%a9-%
ReplyDeleteشركة عزل اسطح و خزانات بالخبر Mvmz1Q6WMJ
ReplyDeleteReally appreciate the information.
ReplyDeleteشركة مكافحة حشرات بالجبيل